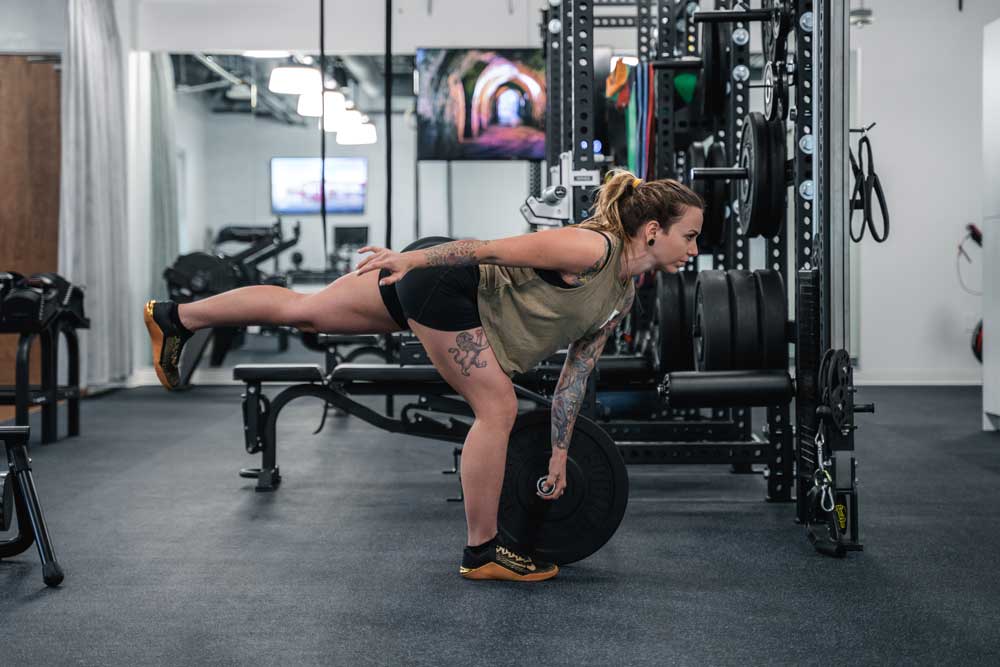
Single Leg Romanian Deadlift (RDL) is a single-leg version of the hip hinge. You stand on one leg. You hinge at the hips and lower your body. The other leg goes back behind you. This exercise builds strength on one side at a time.
Here are correct form examples of the Single Leg RDL:


What are the Key Technique Cues for Hip Hinge and Single Leg RDL?
Basic Hip Hinge Cues
- Push hips back first (like closing a door with your butt).
- Keep your back flat and straight.
- Look forward to keep your neck neutral.
- Bend your knees a little, but not too much.
- Feel a stretch in your hamstrings (back of thighs).
Single Leg RDL Key Points
- Start in a tall-tight position: stand tall, shoulders back, core tight.
- Keep hips parallel to the floor (do not twist or open one hip).
- Keep the back leg straight (long line from heel to head).
- Lower until your body is almost parallel to the floor.
- Drive hips forward to stand back up.
What are the Benefits of Single Leg RDL?
Single Leg RDL gives many good results:
- Improves ankle stability (helps prevent ankle rolls).
- Builds hip stability (keeps hips strong and even).
- Makes knees more stable (good for knee health).
- Increases lower body strength (especially glutes and hamstrings).
- Fixes muscle balance (one side cannot hide behind the other).
- Makes you look athletic and strong.
How Do I Progress to Single Leg RDL?
Start easy and get harder step by step. This keeps you safe and helps you learn.
1. Bottom Up Single Leg RDL Start from the bottom position (bent over). Stand up using one leg. This teaches control without losing balance first.
2. Leverbell Assisted Drill Hold a pole or broomstick in front of you. Use it to help balance while you practice the movement.
3. Landmine Single Leg RDL Put one end of a barbell in a corner (landmine setup). Hold the other end and hinge on one leg. The bar gives support and guides your path.
Here is how the landmine version looks:
Single Leg Landmine RDLs – For a pumped-up peach & stable hips
4. 2 KB / DB Free Standing Hold two kettlebells or dumbbells in front. Do the full movement without help. This is the hardest version.
Free standing kettlebell example:

One Kettlebell Single Leg Deadlift
What are Common Mistakes in Single Leg RDL?
Avoid these mistakes to stay safe and get better results:
- Rounding your back (this hurts the spine).
- Bending the standing knee too much (loses the hip hinge).
- Letting the hips twist or open (breaks parallel position).
- Looking down (strains the neck).
- Going too fast (loses control and balance).
Here are examples of bad form to avoid:
Single-Leg Romanian Deadlift Guide: Forms, Benefits & Muscles Worked
How Should Beginners Program Single Leg RDL?
Beginners need a smart plan.
- Assess first: Can you do a normal hip hinge well? Can you balance on one leg for 10 seconds?
- Start with no weight or very light weight.
- Do not use heavy loads on day one.
- Begin with 2–3 sets of 6–8 reps per leg.
- Use progressions from easy to hard.
- Train 2–3 times per week.
- Rest 1–2 days between sessions.
- Add weight only when form is perfect.
The Single Leg RDL is a great exercise. It builds strength, balance, and stability. Practice the hip hinge first. Then add the single-leg version slowly. You will get stronger and move better!
What Are Glute Activation Drills?
Glute activation drills are simple exercises. They wake up your glute muscles (butt muscles). Many people have “sleepy” glutes from sitting too much. These drills help your glutes fire properly before bigger exercises like squats, deadlifts, or single leg RDLs.
Good glute activation improves:
- Better hip power
- Less lower back strain
- Improved balance
- Stronger lifts
- Also read : Types of Sauna Services
Why Do Glute Activation Before Training?
Your glutes are the strongest muscles in your body. When they are weak or not firing, other muscles (like lower back or quads) take over. This causes poor form and possible pain. Activation drills turn your glutes “on” so they work during your workout.
Top 5 Beginner-Friendly Glute Activation Drills
Do these drills slowly. Focus on feeling the squeeze in your glutes. Do 2–3 sets of 10–15 reps per side (or per exercise).
1. Glute Bridge Lie on your back with knees bent and feet flat on the floor. Push through your heels. Lift your hips up until your body makes a straight line from knees to shoulders. Squeeze your glutes hard at the top for 2 seconds. Lower slowly.
Here are clear examples of proper glute bridge form:
(Imagine 3–4 side-by-side photos showing start position, top squeeze, and common mistake of arching the back)
2. Single Leg Glute Bridge Do the same glute bridge, but lift one foot off the floor. Keep the working leg bent and push through that heel. This makes each side work alone (great for fixing imbalances).
Single-leg version photos show the lifted leg straight or bent at 90 degrees with strong glute squeeze.
3. Clamshell Lie on your side with knees bent at 90 degrees. Keep feet together. Open your top knee like a clamshell while keeping hips stacked. Squeeze the glute on the top side. You can add a resistance band around thighs for more challenge.
Clamshell photos show the movement from front and side views with band option.
4. Fire Hydrant Start on hands and knees (quadruped position). Keep knee bent at 90 degrees. Lift one leg out to the side like a dog at a fire hydrant. Keep hips level — do not twist. Squeeze the glute at the top.
Fire hydrant photos highlight keeping the core tight and hips square.
5. Donkey Kick Still on hands and knees. Keep knee bent. Push one foot straight back and up toward the ceiling. Squeeze the glute hard at the top. Keep back flat — no arching.
Donkey kick examples show full extension with strong glute contraction.
Quick Tips for Better Glute Activation
- Move slowly (2–3 seconds up, 2 seconds squeeze, 2–3 seconds down).
- Think “squeeze the glute” instead of just moving the leg.
- Put your hand on your glute to feel it working.
- Breathe out during the squeeze.
- Stop if you feel it mostly in your lower back or hamstrings.
- Add a light resistance band when it gets easy.
How to Use These Drills in Your Workout
Do 1–3 of these drills before your main workout. Spend 5–8 minutes total. Example warm-up:
- 12 Glute Bridges
- 10 Clamshells each side
- 10 Donkey Kicks each side
Your glutes will feel awake and ready. This simple step makes your squats, hip hinges, and single leg RDLs work better and feel stronger.
Practice these drills 3–4 times per week. Soon your glutes will wake up faster and stay stronger!
FAQ
1. What is a Single Leg RDL?
A Single Leg RDL is a strength exercise where you balance on one leg while performing a hip-hinge movement. It mainly targets the glutes, hamstrings, lower back, and improves overall balance and stability.
2. What are the benefits of Single Leg RDL?
- Strengthens glutes and hamstrings
- Improves balance and coordination
- Activates core muscles
- Reduces risk of injury
- Enhances athletic performance
3. How should beginners perform a Single Leg RDL?
Beginners should start with bodyweight first.
- Stand on one leg
- Keep the other leg extended backward
- Hinge at the hips while keeping the spine neutral
- Use a wall or stick for balance if needed
4. What are common mistakes in Single Leg RDL?
- Rounding the lower back
- Using too much weight
- Bending the knee excessively
- Losing balance due to poor control
- Performing reps too fast
5. How often should you do Single Leg RDL?
For beginners, 2–3 times per week is ideal.
Perform 2–3 sets of 8–12 reps per leg, allowing proper rest between workouts.
Read about : Saunawash products online
Article by : Saunawash